
(Created page with "{| class="wikitable" style="text-align:center;" | align="centre" |- | style="width:100px; font-weight: bold;" rowspan="5" | First Floor | style="padding:5px; background-color...") |
m |
||
| (One intermediate revision by one other user not shown) | |||
| Line 2: | Line 2: | ||
|- | |- | ||
| style="width:100px; font-weight: bold;" rowspan="5" | First Floor | | style="width:100px; font-weight: bold;" rowspan="5" | First Floor | ||
| − | | style="padding:5px; background-color: #fff;"| https://www.lomcn. | + | | style="padding:5px; background-color: #fff;"| https://www.lomcn.net/wiki/images/dungeons/zuma_temple/ZumaTemple_1F.jpg |
|- | |- | ||
|} | |} | ||
| Line 8: | Line 8: | ||
|- | |- | ||
| style="width:100px; font-weight: bold;" rowspan="5" | Second Floor | | style="width:100px; font-weight: bold;" rowspan="5" | Second Floor | ||
| − | | style="padding:5px; background-color: #fff;"| https://www.lomcn. | + | | style="padding:5px; background-color: #fff;"| https://www.lomcn.net/wiki/images/dungeons/zuma_temple/ZumaTemple_2F.jpg |
|- | |- | ||
|} | |} | ||
| Line 14: | Line 14: | ||
|- | |- | ||
| style="width:100px; font-weight: bold;" rowspan="5" | Third Floor | | style="width:100px; font-weight: bold;" rowspan="5" | Third Floor | ||
| − | | style="padding:5px; background-color: #fff;"| https://www.lomcn. | + | | style="padding:5px; background-color: #fff;"| https://www.lomcn.net/wiki/images/dungeons/zuma_temple/ZumaTemple_3F.jpg |
|- | |- | ||
|} | |} | ||
| Line 20: | Line 20: | ||
|- | |- | ||
| style="width:100px; font-weight: bold;" rowspan="5" | Fourth Floor | | style="width:100px; font-weight: bold;" rowspan="5" | Fourth Floor | ||
| − | | style="padding:5px; background-color: #fff;"| https://www.lomcn. | + | | style="padding:5px; background-color: #fff;"| https://www.lomcn.net/wiki/images/dungeons/zuma_temple/ZumaTemple_4F.jpg |
|- | |- | ||
|} | |} | ||
| Line 26: | Line 26: | ||
|- | |- | ||
| style="width:100px; font-weight: bold;" rowspan="5" | Fifth Floor | | style="width:100px; font-weight: bold;" rowspan="5" | Fifth Floor | ||
| − | | style="padding:5px; background-color: #fff;"| https://www.lomcn. | + | | style="padding:5px; background-color: #fff;"| https://www.lomcn.net/wiki/images/dungeons/zuma_temple/ZumaTemple_5F.jpg |
|- | |- | ||
|} | |} | ||
| Line 38: | Line 38: | ||
|- | |- | ||
| style="width:100px; font-weight: bold;" rowspan="5" | Seventh Floor - Lobby | | style="width:100px; font-weight: bold;" rowspan="5" | Seventh Floor - Lobby | ||
| − | | style="padding:5px; background-color: #fff;"| https://www.lomcn. | + | | style="padding:5px; background-color: #fff;"| https://www.lomcn.net/wiki/images/dungeons/zuma_temple/ZumaTemple_7F_Lobby.jpg |
|- | |- | ||
|} | |} | ||
| Line 44: | Line 44: | ||
|- | |- | ||
| style="width:100px; font-weight: bold;" rowspan="5" | Seventh Floor - Level 1 | | style="width:100px; font-weight: bold;" rowspan="5" | Seventh Floor - Level 1 | ||
| − | | style="padding:5px; background-color: #fff;"| https://www.lomcn. | + | | style="padding:5px; background-color: #fff;"| https://www.lomcn.net/wiki/images/dungeons/zuma_temple/ZumaTemple_7F_Lv1.jpg |
|- | |- | ||
|} | |} | ||
| Line 50: | Line 50: | ||
|- | |- | ||
| style="width:100px; font-weight: bold;" rowspan="5" | Seventh Floor - Level 2 | | style="width:100px; font-weight: bold;" rowspan="5" | Seventh Floor - Level 2 | ||
| − | | style="padding:5px; background-color: #fff;"| https://www.lomcn. | + | | style="padding:5px; background-color: #fff;"| https://www.lomcn.net/wiki/images/dungeons/zuma_temple/ZumaTemple_7F_Lv2.jpg |
|- | |- | ||
|} | |} | ||
| Line 56: | Line 56: | ||
|- | |- | ||
| style="width:100px; font-weight: bold;" rowspan="5" | Seventh Floor - Level 3 | | style="width:100px; font-weight: bold;" rowspan="5" | Seventh Floor - Level 3 | ||
| − | | style="padding:5px; background-color: #fff;"| https://www.lomcn. | + | | style="padding:5px; background-color: #fff;"| https://www.lomcn.net/wiki/images/dungeons/zuma_temple/ZumaTemple_7F_Lv3.jpg |
|- | |- | ||
|} | |} | ||
| Line 62: | Line 62: | ||
|- | |- | ||
| style="width:100px; font-weight: bold;" rowspan="5" | Kings Room | | style="width:100px; font-weight: bold;" rowspan="5" | Kings Room | ||
| − | | style="padding:5px; background-color: #fff;"| https://www.lomcn. | + | | style="padding:5px; background-color: #fff;"| https://www.lomcn.net/wiki/images/dungeons/zuma_temple/ZumaTemple_KingRoom.jpg |
|- | |- | ||
|} | |} | ||
| Line 68: | Line 68: | ||
=== Provinces === | === Provinces === | ||
[[Mongchon Province]] | [[Mongchon Province]] | ||
| + | |||
| + | === Maze Route === | ||
| + | LDRRR or LULURR | ||
=== Caves === | === Caves === | ||
[[Bug Cave]], [[Stone Tomb]], [[Fox Cave]], [[Forgotten City]] | [[Bug Cave]], [[Stone Tomb]], [[Fox Cave]], [[Forgotten City]] | ||
__NOTOC__ | __NOTOC__ | ||
Latest revision as of 22:43, 11 November 2024
| First Floor | 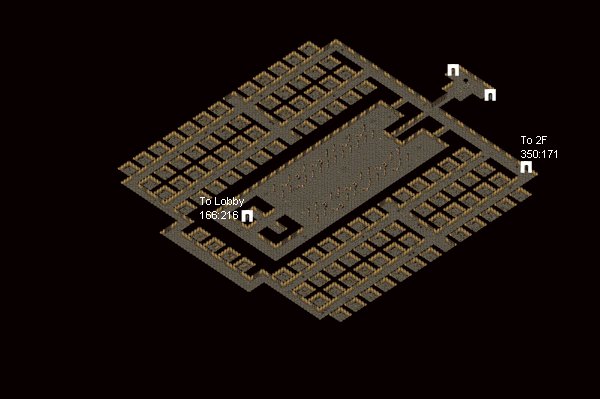
|
| Second Floor | 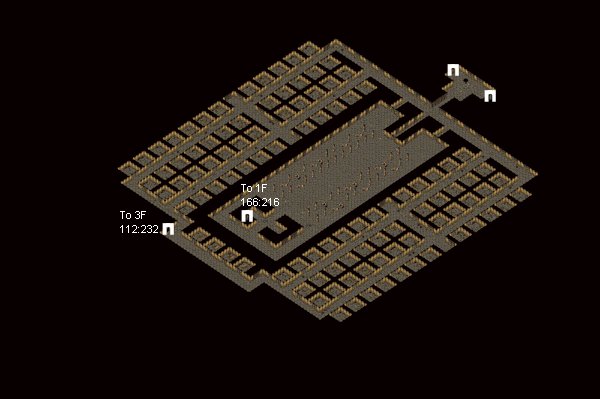
|
| Third Floor | 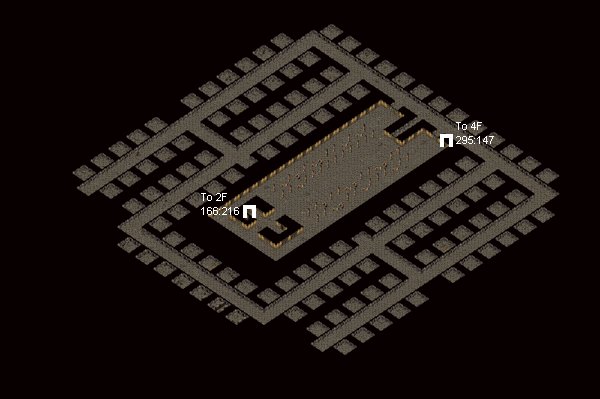
|
| Fourth Floor | 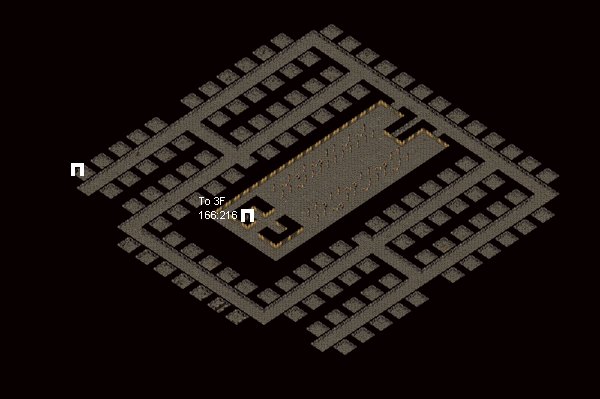
|
| Fifth Floor | 
|
| Maze | Route - U U L U R R R |
| Seventh Floor - Lobby | 
|
| Seventh Floor - Level 1 | 
|
| Seventh Floor - Level 2 | 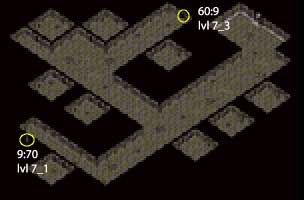
|
| Seventh Floor - Level 3 | 
|
| Kings Room | 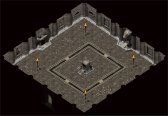
|
Nearby Locations
Provinces
Maze Route
LDRRR or LULURR